How to Remove Old Vehicle Glass Tinting and Apply New Film
Upgrade your car’s style and comfort with professional vehicle glass tinting that offers privacy, UV protection, and a cooler interior
Vehicle window tinting not only enhances the look of your car, but it also provides privacy, reduces heat, and protects the interior from harmful UV rays. However, over time, the tint may fade, peel, or become outdated. When this happens, removing the old film and applying a new one is necessary. If you're planning to do this on your own, this guide will walk you through the process in a simple and easy-to-follow way.
Note : Ready to give your car a fresh new look with vehicle glass tinting? Protect your interior, enhance privacy, and enjoy a cooler ride today. Contact us now for professional tinting services and experience the difference
Why Remove Old Tint from Vehicle Windows?

The Importance of Removing Old Tint
Old window tint can become damaged over time, which may cause it to lose its effectiveness. This might include:
- Peeling and bubbling: These are signs that the adhesive has started to break down.
- Discoloration: The tint can fade, turning purple or brown, making it look unattractive.
- Reduced visibility: Damaged tint can make it harder to see through your windows, which could be dangerous while driving.
Benefits of Removing Old Tint
Removing old tint can improve both the look and functionality of your car. Some benefits include:
- Improved appearance: Fresh tint can give your vehicle a sleek, modern look.
- Better visibility: Clear windows without peeling or bubbling make driving safer.
- UV protection: New tinting can help block harmful UV rays, keeping your car's interior cooler and protecting the upholstery from fading.
What You Need Before Starting
Before starting the process of removing old tint and applying new film, you will need a few supplies. Most of these items are easy to find and affordable.
Tools and Materials
Here are the basic tools and materials you'll need:
- Razor blade or utility knife: To help peel off the old tint film.
- Window cleaner or soap and water: To clean the glass before applying new tint.
- Ammonia-based solution: Helps dissolve the adhesive holding the tint in place.
- Plastic scraper: For removing any remaining adhesive without scratching the glass.
- Sponge or cloth: To wipe down the window during and after the removal.
- Tint film: The new tint you'll be applying once the old one is removed.
- Squeegee: To smooth out the new tint and remove air bubbles.
- Spray bottle with soapy water: Used for applying the new tint film smoothly.
Safety Precautions
When working with window tint, especially when removing the old adhesive, it's important to take some safety precautions:
- Work in a well-ventilated area: Ammonia-based solutions can have strong fumes.
- Wear gloves: To protect your hands from chemicals.
- Be careful with sharp tools: When using a razor blade or utility knife, always cut away from yourself to avoid injury.
Step-by-Step Guide to Removing Old Vehicle Glass Tinting
Removing old window tint can seem like a tricky task, but by following these steps, you can do it effectively and safely.
Step 1: Prepare the Area
Before you start, park your car in a shaded or well-ventilated area. You don't want to work in direct sunlight, as this can make the process more difficult due to the heat.
- Lay down a protective covering: Use towels or plastic sheets to protect the interior of your car from the adhesive and ammonia solution.
- Open the windows slightly: This will allow for better airflow and make it easier to handle the tint.
Step 2: Apply Ammonia Solution to the Tint
The ammonia-based solution will help break down the adhesive holding the tint to the glass.
- Spray the solution generously: Use the spray bottle to cover the window film with the ammonia-based solution.
- Cover with plastic: After spraying, cover the window with a plastic sheet or garbage bag. This helps trap the ammonia and makes it work faster.
Step 3: Let the Solution Sit
Allow the ammonia solution to sit for about 30-60 minutes. This gives it time to soften the adhesive so that the tint can be peeled off easily.
- Check the progress: After 30 minutes, check to see if the film is loosening. If not, let it sit for another 15-30 minutes.
Step 4: Peel Off the Old Tint
Once the adhesive has softened, it's time to peel off the tint.
- Start at a corner: Use a razor blade or utility knife to lift one corner of the tint film.
- Peel slowly: Carefully pull the tint off in one piece. If it tears, just lift another corner and continue peeling.
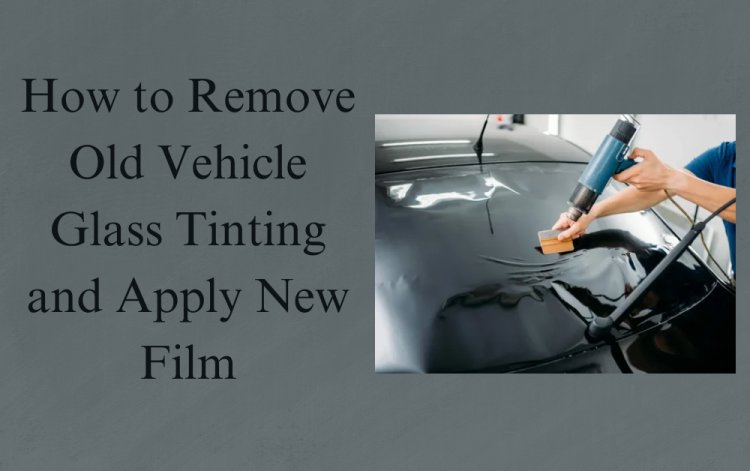
- Use heat if necessary: If the tint is stubborn, you can use a hairdryer or heat gun to warm the film, making it easier to remove.
Step 5: Remove Any Remaining Adhesive
After the tint is removed, there may still be some adhesive residue left on the glass.
- Scrape off adhesive: Use a plastic scraper to gently remove any remaining adhesive. Be careful not to scratch the glass.
- Clean the window: Spray the window with the ammonia solution or soapy water and wipe it down with a sponge or cloth.
How to Apply New Vehicle Tint Film
Now that the old tint is removed and the windows are clean, it's time to apply the new tint film.
Step 1: Clean the Window Again
Even though you've cleaned the window before, it’s important to make sure the surface is spotless before applying new tint.
- Use window cleaner: Wipe the window down with a good glass cleaner and a microfiber cloth to remove any dust or fingerprints.
- Check for streaks: Make sure there are no streaks or smudges, as these can be visible under the new tint.
Step 2: Measure and Cut the Tint Film
Tint film usually comes in rolls, so you'll need to measure and cut it to the correct size for each window.
- Measure the window: Use a tape measure to determine the exact dimensions of your car windows.
- Cut the film: Lay the tint film on a flat surface and cut it to size, leaving a little extra around the edges for adjustments.
Step 3: Apply Soapy Water to the Window
Spraying soapy water on the window will help you position the tint film and remove air bubbles.
- Spray generously: Make sure the entire surface of the window is covered with the soapy water solution.
- Keep it wet: The soapy water allows you to slide the tint film into place and make adjustments.
Step 4: Apply the Tint Film to the Window
Carefully place the pre-cut tint film on the wet window surface.
- Align the edges: Position the film so that it covers the entire window, leaving a small margin around the edges.
- Smooth out the film: Use your hands to gently press the film onto the window.
Step 5: Use a Squeegee to Remove Air Bubbles
Air bubbles can get trapped between the tint film and the glass, so it’s important to remove them.
- Work from the center out: Use a squeegee to smooth the film, pushing air bubbles and excess water toward the edges.
- Be patient: Go slowly to avoid wrinkles and ensure a smooth finish.
Step 6: Trim Excess Tint Film
Once the tint is applied and all bubbles are removed, you'll need to trim any excess film.
- Use a sharp utility knife: Carefully cut along the edges of the window to remove the extra tint film.
- Be precise: Ensure that the film fits perfectly within the window frame without overlapping onto rubber seals or trim.
Tips for a Professional Finish
Work in a Clean Environment
Dust and dirt can easily get trapped under the tint film, so make sure you're working in a clean, dust-free area. This will help you achieve a smoother, more professional-looking finish.
Take Your Time
Rushing the process can lead to mistakes like air bubbles, wrinkles, or misalignment. Be patient and work carefully to ensure the best results.
Don’t Forget to Let It Cure
After applying the new tint, avoid rolling down the windows for at least 24-48 hours to allow the tint film to properly adhere to the glass.
Final Thoughts
Removing old vehicle glass tinting and applying new film can seem like a daunting task, but with the right tools and a little patience, it’s a project you can tackle yourself. By following the steps outlined in this guide, you can give your car a fresh new look while improving visibility and comfort.
Now that you're equipped with the knowledge on how to do it, why not give it a try? If you prefer, you can always consult a professional to get the job done quickly and efficiently
For more insightful articles related to this topic, feel free to visit .newswireengine.com
What's Your Reaction?


.jpg)
